database activity
E 'necessary at this point to initialize a database
, ' s administrator
that. In the case of MySQL, you can find good tutorials
here and here
, management command line
To start the service
in console root: # service mysqld start To stop
:
# service mysqld stop restart
For while it is running: # service mysqld restart :
# service mysqld stop restart
To start the service  startup (boot) the computer, so as to avoid having to activate every time you want to use (command option): # chkconfig mysqld on
 To test the operation of
 MySQL, so as to verify if indeed it was activated and what the process is associated with: # pgrep mysqld
All ' application installation, MySQL automatically creates a administrator named root and a user named mysql, both without password. Although it is not essential for our installation, it should eliminate the possibility of access to the database so
anonymous and insecure.
To do this you must delete the users, except administrator, assign a password to the administrator, create the database that we are concerned (it can manage multiple MySQL database), create our user associated with a password, and allow the user 'access to the specific database. Let's see how. First enter the MySQL server as an administrator: # mysql-u root
The prompt will change to:
mysql>
To delete the users
(to do only the first initialization of the MySQL server, where the only user is the one created by default by the system if the server has already been used and have already created other users, this can damage
access to MySQL, it must be done sensibly):
mysql> mysql DELETE FROM WHERE User ='';
The semicolon at the end of the sentence is important because it is part of the syntax of MySQL and indicates end of command,''content is empty quotes.
update privileges
hours, to allow MySQL to recognize the change that we made: mysql> FLUSH PRIVILEGES;
At this point we set the administrator password
in the example below, the password is he43klc9 and is contained in quotes, replace it with one of your choice: mysql> mysql UPDATE . User Set Password = 'he43klc9' WHERE User = 'root';
So
create the database, called joomladb, and update the server. mysql> CREATE DATABASE joomladb; mysql> FLUSH PRIVILEGES;
To see databases that were created mysql> SHOW DATABASES;
To remove the database created: mysql> DROP DATABASE joomladb;
mysql> FLUSH PRIVILEGES;
then we create our
user (in this example is foo) and its
password (in the asdasd is) and the database created
associamolo
(in this example is joomladb) on the server localhost, and then update MySQL: mysql> GRANT ALL PRIVILEGES ON .* TO joomladb foo @ localhost IDENTIFIED BY 'asdasd' WITH GRANT OPTION; mysql> FLUSH PRIVILEGES; If
be created
more than one database and you want to associate the user to all databases created, the command becomes:
mysql> GRANT ALL PRIVILEGES ON *.* TO foo @ localhost IDENTIFIED BY 'asdasd' WITH GRANT OPTION;
mysql> FLUSH PRIVILEGES ;
To see users who can log
:
mysql> SELECT Host, User FROM mysql;
To delete a user
mysql> DELETE FROM mysql WHERE Host = 'localhost' AND User = 'foo';
mysql> FLUSH PRIVILEGES
where foo is the user and localhost is your host in the table.
To exit the MySQL type:
mysql> EXIT;
For
fall in MySQL, type: # mysql-u xxxxx-p where xxxxx is your user or administrator. The-p option is used to ensure that the server requests a password that you set before, if you had not set, remove the option (-p) before giving the command.
If
postgreSQL in root console, initializing the database, as described here
and
here will be:
# Service postgresql initdb
Starting the database
At this time, the only user recognized (and Loggable) in the database is postgres
. To create databases and more people
Loggable is essential to log and start a session as postgres user.
# su-l postgres (note the change of the reference of bash)
password setting and its rekeying
for confirmation.
Now let's create a database with the same name
the newly created user. The syntax is: -bash-4.0 $ createdb-E utf8-W-O username username
will be asked to confirm the password you just set.
Now edit the configuration file of the security
PostgreSQL
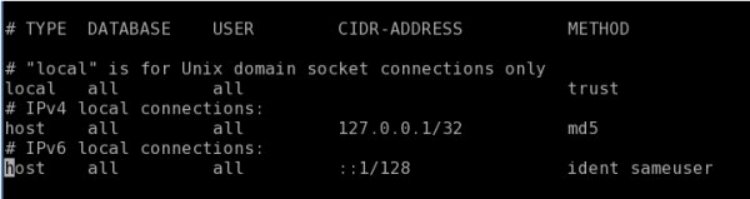
-bash-4.0 $ nano / var / lib / pgsql / data / pg_hba.conf
 scroll with the sidebar to the bottom of the file and edit
 replacing lines respectively to the local host and IPv4 values \u200b\u200bidentification: local all all trust host all all 127.0.0.1/32 md5 get something like this:
Instead of trust can be put md5 , for added security. Then type ^ O to save the file ^ X to exit nano and return to the shell (^ corresponds to the control key). Obviously, the nano can be used instead of the more complex there (to quit vi use the command: wq) Restart the database by typing
-bash-4.0 $ service postgresql reload
If bash give error
(eg.
because the user does not have sufficient privileges
to perform the requested operation), we open a new tab bash, we enter into with the + console root password and give the same command to reload Other settings can be found in the link shown.
Here you can find another good tutorial.
Now
close the console and launch the GUI pgAdmin III (in Fedora Menu -> Programming). The screen access to the database: insert data on this that we have set:
username
,
database name and password , insert as host 127.0.0.1
and our db is ready.
 Use the Joomla!
 Open the browser and launch http://127.0.0.1 and immediately check that the site is active, and that all settings are up and running, including the autofill configuration.php file.
If the automatic setting is not accepted (that was marked in red
)
not continue, close the browser, open the shell and, in the console root,
change permissions to the folder where the site a recursive command type # chmod 777-R / media/HD350GB/Serverspace so cut the bull's head. (NB remember to set the correct path of your folder) NB this
NOT 'GOOD
in terms of security, and it can serve only if your local server is not published
, otherwise they are trouble. The transaction is correct
replace the owner of the folder (right now you) with apache . With $ cat / etc / group verify the existence of the user 'apache'. With sudo chown-R apache: apache / media/HD350GB/Serverspace assign user and group apache recursively all the folders in Serverspace. If we want to tweak
directly to these folders (with full knowledge of the case) then the operation is more correct
add our user to the group with apache  # gedit / etc / group
 # gedit / etc / group
 adding the user, with separate a point chosen by the other members to the group. Are you afraid to make mistakes typing, this can also be made via the menu Administration -> Users and Groups
will need to restart Apache So and restart the browser, I think the inclusion data, everything should work properly.
Also, if you have applied the procedure both databases, you can choose between MySQL and PostgreSQL, both functioning as RDBMS support. If you choose MySQL, use the option mysql and mysqli
not an option, especially for matters of convenience, in the Advanced Settings and verify that the parameter is set
jos_
.
At this point you should have passed all the obstacles, type in your initial customization (name of your website, email reference, password) and create your Joomla site.
Good site to everyone! :-) PS Thanks to Mirella for their help and patience in reviewing this tutorial.
(\u0026lt;- back to 02 to 03)
0 comments:
Post a Comment